Search

Dr. Amy Doherty

Let us seek health for ourselves, our community, and our world.

SUPER EASY snack/main course from Japan: Edamame

Aldi has a bag of Edamame for a few bucks. Boil it for 3 minutes, put some salt an/or whatever else you want on it… lemon, pepper, soy sauce… and you have an anti-inflammatory, cholesterol-busting meal in a few minutes.  Way easier than popping chicken nuggets or a pizza in the oven.

Other super-easy Aldi finds… they typically have some type of veggie burger with a base of quinoa, kale or beans instead of meat.  This means your burger could have fiber instead of fat and reduced calories for the same volume, but be just as easy to prepare.  There are also bags of grains, beans, and veggies that make a meal in minutes.  If beans, grains, and veggies do NOT sound appetizing to you right now, do not despair.  It may take a few weeks to get your palate more used to veggies and less used to junk food.  In fact, it normally takes about two weeks.  img_3780

Berries are in season!

Berries are one of the best things you can put in your body, AND they are in season right now!  Flyte Family Farms has had berry picking open since June 16th, they are in most Farmer’s Markets around the area, and they are cheap and delicious in the store.  Although strawberry season is almost over, we are in the middle of cherry season, blueberries/rasberries/strawberries should be here soon, and I’ve been picking mulberries off trees in the street when I go on walks with the dog (they aren’t as sweet or as expensive as the other varieties but I think they are still good…).

So why are berries so good for you?  Let’s start with the anti-inflammatory compounds like anti-oxidants and anthocyanins.  The short way to say this: higher consumption of berries has been linked to slowing cognitive degeneration, reducing risk of cancer, improving glaucoma, improving immune function, decreasing arthritis… it would almost be easier to ask what berries DON’T help rather than what they DO help as that list would be shorter.  Oxidation is how the body rusts or ages, and berries contain compounds that prevent or reverse this from happening.   All fruits and veggies have these compounds to some degree, but berries are especially rich in them.

Next, let’s talk about glycemic index.  Glycemic index is a measure of how fast a food raises your blood sugar.  The faster your sugar rises, the harder it is for your body to deal with the sugar you just consumed and respond appropriately.  High glycemic index foods, like those containing sugar and white, processed flour, will skyrocket your blood sugar, then make you crash a few hours after eating them.  High glycemic index foods can increase risk for diabetes or make diabetes harder to control.  Temperate fruits, or fruits that are grown in areas like Wisconsin like apples and berries, are relatively low glycemic-index fruits.  This is in contrast to high-glycemic index fruits that are grown in tropical regions, like mango, banana or pineapple.  This means that although temperate fruits are sweet, the balance of sweetness, fiber, and other ingredients helps it to be absorbed by your body in a way to not put too much strain on the system to digest.  Any fruit is typically going to have a lower glycemic index than typical processed, sugary desserts or treats though like doughnuts or cake… so even though temperate is best, fruit is best in general as a sweet treat.

As far as a quick recipe with berries, one way I will add cream to berries for a quick and healthy dessert is by making cream from a can of Coconut Milk instead of using whipping cream.  Although coconut oil still contains saturated fat, which is the fat you are supposed to avoid because it can wreak havoc on your vascular system causing plaques, it has a short-chain saturated fat instead of a long-chain saturated fat like animal-based fats do. Eating less fat is best, but if you are going to indulge might as well do it with an oil that is associated with lower rates of heart disease instead of higher rates of heart disease.

Recipe

To make coconut milk cream, take a can of CHILLED coconut milk… like put it in the fridge.  This is important because coconut oil is more likely to be liquid at room temperature/temperatures above 72 degrees, partly because of those short-chain saturated fats I talked about. Take out the top, white, creamy part of the coconut milk, and about half of the clear liquid underneath.  Blend it together using any type of blending tool- a Kitchen-Aid, immersion blender, classic blender, whisk, egg beater, something like that- and blend for several minutes until the coconut becomes light and creamy like whipped cream.  Add to berries for a summer-y dessert perfect for the 4th of July (especially if you have red and blue berries to go with the white cream!) or any summer get together where taste and health should be the forefront.

Quick, Easy Breakfast

To get right to the point, this is a quick, easy breakfast idea that takes about as much time to make as a pop-tart, but will make you feel good the whole morning instead of giving you a high-then-low sugar roller-coaster without nutrients.

Ingredients

  • 2 slices whole-grain bread
  • 2 Tablespoons nut butter of choice
  • Enough fresh, frozen or dried fruit to cover top of each slice of bread

Directions: Take some type of high-quality whole-grain bread, spread it with a nut butter like peanut butter, almond butter or cashew butter, and add a fresh fruit on top.

High-quality bread includes Ezekiel bread or bread that says “100% whole wheat” (not just “multi-grain” as that’s often code for “mostly processed white flour”).  Ezekiel bread is so healthy because it contains a variety of whole grains without added sugar, but it can be twice as expensive as normal bread ($4.99/loaf) because it is so rich in nutrients.  Processed white bread can sit on the shelf forever and not go bad because, if it’s mostly sugar, salt and processed white flour, not even bacteria and mold want to eat it, and longer shelf-life= less cost.  Ezekiel bread is often sold in the freezer section, and I will store it that way at home, too, until I use it.  Then I will warm it up in the toaster oven to defrost it.

Breakfast seems like the meal that seems to fool people the most.  There are many breakfast cereals that purport being healthy, however the first ingredient on the ingredients list is sugar.  With names like “Blueberry Morning,” “Apple Jacks,” and “Quaker Oats Oh’s!”, or “Cap’n Crunch All Berries,” I mean, they sound healthy.  They look healthy.  But they’re not, and it’s super frustrating when you are trying to make a healthy decision but the packaging thwarts your efforts.  As a rule, most breakfast cereals are just junk :-(.  Yogurt is also very rich in sugar, typically.

Breakfast options that normally aren’t junk include steel-cut oatmeal flavored with cinnamon, nutmeg, and fruit; plain yogurt that you flavor yourself with fruit, maca powder, or stevia instead of sugar.  Maca and stevia are just sweet-tasting things that don’t ramp up your blood sugar like white sugar does, and often have important nutrients sugar doesn’t have.  Firm tofu can be made into a scrambled-egg like dish if you add smoked paprika and turmeric for color and flavor, along with garlic, onion, soy sauce, black pepper, and nutritional yeast if you have it on hand.  Other good breakfast options include any type of non processed fruit, veggie, bean or grain product.

Asparagus: Spring in a Vegetable


        SPRING

From you have I been absent in the spring,
When proud pied April, dressed in all his trim,
Hath put a spirit of youth in every thing.
Sonnet 98, 1-3, William Shakespeare

Spring does not have the bounty of summer produce, but the foods that are available are full of personality.  In old French cookbooks, they would note that certain recipes needed an “April egg,” because it would be lighter flavor and color than eggs the rest of the year. If there aren’t a lot of insects for the chickens that produce them to eat, you can tell in the egg they produce.  This mindfulness about where food comes from, how it is produced, and how we fit into the amazing ecosystem where we live always makes me pause in wonder.  Community Supported Agriculture shares are a great way to regularly get seasonal produce this year.  I am very excited to start getting our CSA share from Luna Circle Farm!  It’s not too late to sign up for many area CSAs.

Back to spring foods with personality… Asparagus has a creamy freshness reminiscent of whipped cream immediately after it is picked, and then begins to become stringy and bitter within days (even within hours) after picking.  It is incredibly crisp in the cool beginnings of the season, bringing forth multiple harvests starting mid-April, and dries away as the season heats up by the end of May.  It has a satisfying, saturated crunch.  What better vegetable to showcase the cool, dewy, ephemeral, unprocessed seasonality of spring than asparagus?  When I see asparagus in the store in winter, I die a little bit inside because I know it must have traveled a long way to get to the store and it just won’t have the same texture and flavor it does in its proper season.  If this is the way you’ve tried asparagus in the past, don’t give up!  You’ve seen its worst side!  It is no surprise that many people don’t like the old, processed asparagus they find in the store if they try it off-season.  Additionally, the worst thing you can do to prepare asparagus is to overcook it.  That’s the opposite of the spirit of this vegetable.  A vegetable that is the harbinger of spring should be undercooked, if anything, just like the season from whence it came.

The best way to eat asparagus in my opinion is straight out of the garden or a wild place you find it.  However, there are some ways to cook it, even if it’s not in its spring-y, youthful self.  Note the common theme in all these recipes is short cooking times to avoid the stringy mess that asparagus becomes when it has been cooked too long.

Roasted Asparagus

Preheat an oven to 425 F.  Lightly coat as much asparagus as you like in olive oil, then sprinkle with freshly ground pepper, a dash of salt and a dash of garlic powder to taste.  Cook in preheated oven for maybe 10-12 min.  Remove, squeeze some fresh lemon over the top, and enjoy.

Sauteed Asparagus

Use all the same ingredients as above, but sautee asparagus over medium heat for about 5 min, so it is slightly wilted but still crispy.

Blanched Asparagus

Blanching involves heating water to boiling, then just barely letting the item being blanched touch the water.  Often having a metal sieve/colander/something you can quickly get the veggie in and out of the water helps. For asparagus, get the water to boiling, put as much asparagus as you’d like to eat in the boiling water for 5-10 seconds, then remove asparagus from the water, plate, and add ingredients from the first recipe.

20170422_115147~2

Buttercup BBQ….Overwintered Produce at the beginning of Spring

This is a hard time of year for a plant-based diet in Wisconsin.  We are so close to the season of amazing fresh produce all the time, full of life, color, spice and variety!  I can almost taste the fresh asparagus spears, fun cool-weather greens like lemon-y sorrel, spicy arugula and kale, and sweet snap peas that arrive in the spring and herald a produce-rich summer and fall…  But we are not quite there yet.  “Local produce” is still limited to whatever we have been able to save from the previous season.  The hearty fruits and vegetables of the fall and winter- rutabagas, parsnips, squash, beets, etc.- can hold out during many of the colder months.  For this recipe, I used overwintered Buttercup squash … it was a bit drier than it would have been when it was harvested in the fall, but still good and sitting in the root cellar brought out even more sweetness over the winter.  If squash is stored in cool cellars it will often last the whole winter, but it is important to check it over if you do this before eating to make sure it is still of good quality after those several months.  Finding varieties of produce that overwinter well used to be commonplace before we were able to ship produce in from all over the country, and I still prefer to overwinter my own produce when possible!  Some varieties of apples can even be stored for months at low temperatures, for example.


Ingredients:

  • 1 buttercup squash, enough olive oil to coat squash,
  • 1 cup uncooked quinoa, 2 c water
  •   Sauce: 1/4 c barbeque sauce (any), chipotle powder or chipotle hot sauce to taste, 1 tbsp olive oil, apple cider vinegar 1 tsp, fresh ground black peppercorns to taste.  Add water to get to desired consistency.

Directions:

  1. Preheat oven to 350 degrees.
  2. Prepare Butternut squash by slicing in half with a large, sharp knife (be careful now!), then removing seeds and strings with a spoon.
  3. Coat Butternut squash halves in olive oil and place on a jelly roll pan, inside-up.  Cook for 30 min.  Then flip and cook inside-down for 30 min.
  4. While the squash is cooking, get the quinoa simmering and make the sauce:  Boil 2 C water, add quinoa, set it to simmer, let it cook for about 20 minutes or until grains look puffy and done.
  5. Making the sauce- combine all ingredients listed under “sauce.”
  6. Combine all ingredients.  You can add other veggies that you might have on hand, if desired, like some greens to jazz up the color, if desired.
  7. Serves 3-4.

Traditional Wisconsin Food

So, I watched this YouTube video about West Coast natives trying “Traditional Wisconsin Food” for the first time.  The food choices were Kringle, Fried Cheese Curds, Herring, Beer Cheese Soup, and a Brandy Old Fashioned.  Now, granted these are relatively popular foods… but what about cranberries?  Wisconsin is the nation’s leading producer of cranberries, harvesting more than 60 percent of the country’s crop. What about Wild Rice?  According to the Wisconsin Historical Society, “The Menominee even took their name from the Indian word for wild rice, manomin, and were often referred to as the Wild Rice People by Europeans.”  It’s a food that needs specific growing conditions, including gently flowing waters with a mucky or organic bottom and in areas with relatively stable water levels during the growing season… Perfect conditions for a state full of rivers and lakes, though the expanse of wild rice fields is much reduced now compared to what it would have been when the Menominee took their name from it.

What about cherries of all varieties?  Sweet Bing, tart red cherries… delicious, one of my favorite foods, grown all over the place in Wisconsin… somehow it didn’t make the list.

What about blueberries?  Blueberries grow in acidic, sandy soil, just like that in our area.

There are so many healthy foods that should be considered a normal, vibrant part of traditional Wisconsin eating culture and habits.  So many foods that get forgotten about in favor of less healthy alternatives.  Let’s start changing that…Some quick ideas using the above ingredients…

Cranberries with recipe ideas from Health.com like cranberry citrus relish, cranberry salsa, and cranberry-orange chocolate smoothies.

Wild Rice– recipe ideas from VegWeb.com.  It can be used in grain salads, stuffing, paellas, or anywhere a more refined grain is typically used (like instead of pasta).

Cherries and blueberries- in addition to eating them throughout the day (since all berries are FANTASTIC additions to the diet because of their low glycemic index and high antioxidant content), you can add them to oatmeal, granola, or anything else that needs a healthy sweetness.

Holiday Fruit and Grain Salad

20161029_172351_hdr

The holidays are a time associated with friends, family, generosity, fond memories, aanndd…. gaining 10 pounds/eating food that makes you feel terrible later but it tastes good now.  Somehow that last portion doesn’t seem to be full of holiday spirit.

What if holiday foods instead were associated with freshness, color, and wholesome ingredients in addition to being completely delicious?  It’s totally possible.  Although this type of holiday food often doesn’t come in a premixed/box form, I believe it should be the new norm.

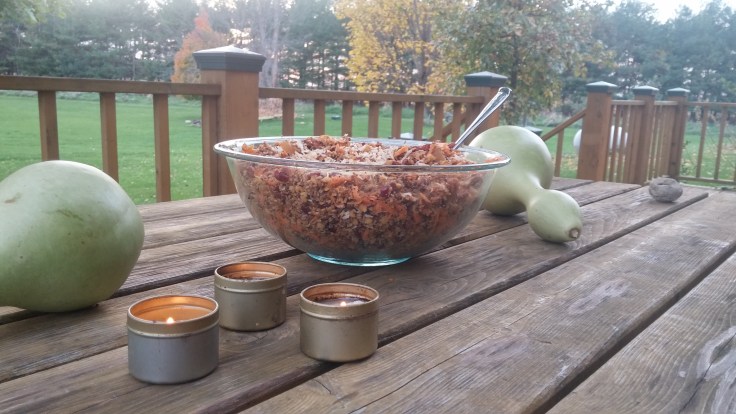
A salad like this was my first foray into healthy, plant-based cooking for the holidays inspired by a holiday edition of Vegetarian Times I read in high school.  I never did find the recipe I used again, but it was so delicious I have been making similar versions of it every holiday since.  The basis of the salad is a cooked grain (whether that be quinoa, amaranth, millet, buckwheat, or bulgur wheat as in this recipe matters not), dried fruit (I typically use cranberries around the holidays, because cranberries), toasted nuts (pecans and walnuts are good choices), and a citrus-y dressing.  I also added legumes to this recipe in the form of red lentils (could also use garbanzo or a colorful variety like cranberry) to improve nutrient value and make it more filling. The more things that are toasted in this recipe, the better it tastes… at least roast the nuts, and get to the coconut and grain if there’s time.  But, it does taste better.

20161029_160900_hdr

Ingredients

Salad

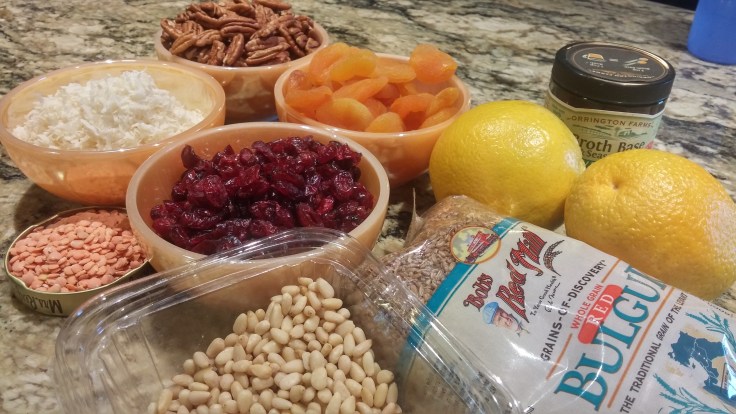
1 c bulgur wheat + 2 c veggie broth

1/2 c dried lentils and 1c veggie broth

4 oz (1/2 c) dried cranberries

4 oz (1/2 c) dried apricots

8 oz (1 c) pecans

I also added 1/4 c pine nuts to this recipe because I had them left over from the previous recipe on this blog.  They’re delicious, but the recipe is fine without them, too.

Dressing

2 oranges (it’s too early in the season for oranges right now, but they will be in season in about a month when holiday time hits)

1/4 c olive oil

1/4 c Red Wine or Apple Cider Vinegar

1 Tablespoon honey

1 Tablespoon mustard.  Stone ground is my fave type, then honey dijon, then your normal yellow…. But in the end whatever you have lying around gets the job done and is therefore best. 😉

Directions

1.) Preheat oven to 400 degrees.  Chop apricots and pecans into bite-size peices, keeping them separated.

2.) Zest 2 oranges, combine zest with the juice of said oranges, mix with olive oil, honey and vinegar.

2.)  Combine lentils and broth in a pot, bring to boil.  Let it cook until water is absorbed and lentils are soft- about 15 minutes.

3.) While lentils are cooking, roast pecans in preheated oven.

20161029_161345_hdr4.)  Also while lentils are cooking, dry roast the bulgur wheat in a 9-12 inch saute pan.  Do this with frequent turning with a spatula until grains are fragrant and golden- 10-15 minutes.  When they are done they will be crunchy but edible.

5.)  Pecans will be done roasting when they are fragrant and crispy- avoid burning them because that would be sad…. And expensive.  This takes about 10 minutes.

6.) After roasting grain, boil the 1 cup of grain in 2 c water, keep cooking until water is absorbed and grains are soft but not mushy… 10-15 min.  Bulgur wheat doesn’t take that long to cook.  When you make tabouli with it, you just pour boiling water on it and let it sit covered for an hour, and that’s enough to cook it.

7.) Combine lentils, grain, pecans, and dried fruit in a large mixing bowl.

8.)  Add dressing to taste, mix it all up.

9.)  Toast coconut in the oven the same way you roasted pecans.  Five minutes in a 400 degree oven should do it.  Garnish/mix in with salad.

10.) Can be served warm immediately or lukewarm the next day.  Keep coconut and dressing reserved until just before serving, otherwise it will get all moist and wilty.  Benefit of this recipe: if made ahead of time, it takes up NO oven space the day of a big event!  It tastes yummy with cranberry sauce, too.

Serves 4

Late Summer Italian Quinoa

20161005_200543I had a request for recipes involving quinoa, sooo this will be the first in a series of quinoa posts. 🙂

Why is quinoa so great?  It has all 8 essential amino acids.  It is delicious and nutty and wonderful.  It is super fast and easy to cook.  It has all the benefits of pasta without any  of the drawbacks: it has a relatively low glycemic index instead of a high one, and it is a whole grain rather than being a processed grain stripped of all its nutrients like the most commonly consumed forms of pasta. It is a fast and easy addition to any meal to help you get whole grains in your diet.  It makes you feel fuller for longer- probably because of the fiber, protein, B vitamins, and whatever else it contains that processed grains lack.  Additionally, you can toast quinoa much the way you would make popcorn on the stove without oil.  This topping allows you to add crunch to salads without using croutons (a.k.a., processed white bread grain with no nutrients and fat), or crunch to cereal/yogurt without all the sugar that is in granola.

For this particular recipe, I was cleaning out my garden at the onset of late fall, and wanted to use my basil and tomatoes before the first frost.  You could easily incorporate quinoa into any recipe that contains a whole grain, whether that be for breakfast seasoned like oatmeal, or in a Mexican rice and bean dish for dinner.  But more on that in subsequent quinoa posts.

Ingredients:

1.) Jar of pesto or see notes below

2.)  1.5 cups of dried quinoa

3.)  1.5 cups chopped fresh tomatoes or equivalent amount of chopped canned tomatoes

4.)  1 X 16 oz can chickpeas (aka garbanzo beans)

20161005_174933Pesto:  You can either purchase a jar a pesto from the store, or make it yourself.  Of course, making it yourself is a more fragrant (omigosh fresh basil leaves), enjoyable way to cook, but it does make the recipe take 10-15 minutes longer.  Since I try to make recipes I post accessible to everyone and ready in less than 25 minutes, this recipe would take too long if I necessitated making your own pesto so… your call.   You need about 1/3 of a cup of pesto.

Rather than reinventing the wheel, I just looked a recipe up online.  Making half of the above recipe would be enough for this recipe. If you would prefer a vegan pesto, soaked and blended cashews are a good substitute for creamy dairy products including Parmesan cheese… 1/2 c cashews soaked overnight  blended with a dash of lemon juice and a tablespoon of  nutritional yeast until creamy would substitute for Parmesan in the above recipe.  For people who have problems with cholesterol or patients with heart problems, the second option with less animal products is best.

Ingredients necessary for pesto if following above recipe link: 2 c fresh basil leaves, 1/4 c olive oil, 1/6 c pine nuts, 1 garlic clove, 1/4 c freshly grated parmesan or cashew substitute, and a dash of salt.

Quinoa

20160914_220152If you like your Quinoa more firm/al dente, cook it with the lid off.  If you like your quinoa more creamy, cook it with the lid on.

1.) Rinse 1.5 cups of quinoa:put 1.5 cups of quinoa in a large bowl.  Add water until covered.  Swish it around, and pour the water off.  This is more important for quinoa in bulk; it washes off a bitter layer of the grain called a saponin.  Some packaged varieties come pre-washed.

2.)  Put 1.5 cups of quinoa in a pot with 3 cups of water.  Bring to a boil, then keep it there for 15 minutes.  All the water should be soaked into the quinoa by the end of cooking; if it’s not, let it cook until it is all soaked in or boiled off.  The trick here is to get the quinoa when it is soft and the water is gone but before it burns… you mainly have to watch it at that 15 minute mark to make sure that happens.

3.)  While it is cooking, prepare tomatoes and garbanzo beans.

  • Tomatoes: chop them up into bite size pieces, or just open the can.
  • Garbanzo beans: open the can, wash off the beans so they don’t have the thick canning liquid on them and are just nice, fresh bean pods.

Mixing it all Up

When the quinoa is done, combine it with tomatoes, garbanzo beans,  and pesto.  If it is of the correct temperature, serve.  If it is too cold, warm it up for several minutes in the pan.

Serves 4.


Save

September Squash

Cooking Acorn squash is incredibly easy, cheap, and can be done many different ways.  You basically have to cut an acorn squash in half, scoop out the seeds (which are edible BTW once roasted), add filling, and cook it covered for 30-45 minutes at 400 degrees.  Maybe five minutes of prep time, wait 45 minutes, and you’re done.

I will give you two versions of this recipe- a savory variety and a sweet variety.  e56dfffdb80bdae854cb150fbeed8b0bresnet7_5

Savory Baked Acorn Squash Recipe- Serves 2-3


This slideshow requires JavaScript.

Ingredients

  1. One halved and seeded acorn squash
  2. Just enough olive oil to coat said acorn squash
  3. 16 cloves of garlic with skin removed (8 per squash half)
  4. 1 heaping cup of mushrooms
  5. Spices including pinch of salt per squash half, freshly ground black pepper to taste (about 1/2 tsp/half), and the following optional spices depending on what you have available: smoked paprika, basil, oregano, marjoram… any of those will taste good with any of the others, so if you have it add a dash of seasoning to each side, if you don’t, don’t worry about it.  Except freshly ground black pepper, that you absolutely have to have.  An even easier option would be using a premade spice mix like steak seasoning or rub… but these often already have pepper and salt in them so don’t worry about adding extra pepper and salt if it’s already in there.
  6. 2 Tablespoons balsamic vinegar.

Directions

  1. Preheat oven to 400 degrees.
  2. Coat each acorn squash half in a thin layer of olive oil.
  3. Combine 16 cloves of garlic, heaping cup of chopped mushrooms, 2 tablespoons balsamic vinegar, and spices of your choice using the above combos as a guide. Fill each half of the acorn squash with half of the above mixture.  Don’t worry about having full cloves of garlic in there- they will cook down to be way less pungent than a fresh clove.  Same thing happens if you saute a full clove of garlic- you will be able to just eat it without issue once it is done cooking.  And this way, even less prep time because you don’t have to chop or mince garlic.
  4. Cook uncovered until tender (if you cover it, garlic won’t cook down.  If you chop garlic you can cover the squash).  Check at 45 minutes, if a fork goes in easily it’s done.  If not wait the full hour and check again. It will normally take 45 minutes for a smaller squash and an hour for a larger one.

Sweet Acorn Squash Recipe- Serves 2-3

This is the recipe that more people know and love, and it just reeks of Autumn :-).

Ingredients

  1. One halved and seeded acorn squash.
  2. Just enough olive oil to coat said acorn squash.
  3. 2 Tablespoons maple syrup or brown sugar
  4. 1/4 tsp of each: ground cinnamon,nutmeg, cloves, and ginger.

Directions

  1. Preheat oven to 400 degrees.
  2. Coat each acorn squash half in a thin layer of olive oil.
  3. Coat each acorn squash with either maple syrup, brown sugar or coconut sugar.
  4. Sprinkle seasonings on each half of acorn squash until covered.
  5. Cover with aluminum foil, cook until tender, about 45 minutes.

Save

Blog at WordPress.com.

Up ↑